
Thursday, December 30, 2010
Tuesday, July 6, 2010

Sunday, July 4, 2010
1015 Folsom Video Installation
The past two weeks I have been installing a video system in the main room of the club 1015 Folsom. We are using 4 projectors to shoot onto a 25 foot wide section of screen cut into 10 strips. The other two projectors blend together to shoot onto three 8 foot wide screens above the DJ booth.
Here are some pics:


The system can take a video input from a V4 video mixer for guest VJs or it can run it's own audio reactive real-time content.
This is our 6 output 3 video card beast, feeding 4 projectors.

Here are some pics:


The system can take a video input from a V4 video mixer for guest VJs or it can run it's own audio reactive real-time content.
This is our 6 output 3 video card beast, feeding 4 projectors.

Wednesday, April 21, 2010
I've been working on a few videos for Anodyne Industries
These are all fully audio reactive and run in real-time.
Made with VVVV.
Download the album here:
IDMf008 - Anodyne Industries The Gateway EP
These are all fully audio reactive and run in real-time.
Made with VVVV.
Download the album here:
IDMf008 - Anodyne Industries The Gateway EP
Anodyne Industries - The Gateway from jonathan ferran on Vimeo.
Anodyne Industries - I Would Die For You (Remix) from jonathan ferran on Vimeo.
Anodyne Industries - Consigned To Oblivion from jonathan ferran on Vimeo.
Anodyne Industries - Blood Train from jonathan ferran on Vimeo.
Anodyne Industries - Make It Darker from jonathan ferran on Vimeo.
Tuesday, March 16, 2010
I think I'm in love.
So there's this program called VVVV. Crazy name, I know... but it's made by Germans so whatever. It's a patcher based visuals program kinda like Max/MSP or PD, but it was built from the ground up for handling realtime graphics and interactivity. VVVV is the Quartz Composer for windows. I haven't used QC but some say VVVV is the more powerful of the two. It uses DirectX so... sorry mac peeps, windows only 8)
Oh yeah, did I also mention it's free for non-commercial use? Actually the license is kinda better than non-commercial. It basically says as long as you don't make a living from using VVVV you can have it for free. I would love to be forced to pay for VVVV one day.
You can do some really cool stuff really easily with 3d graphics in VVVV. rendering a model is as simple as patching a shape into a renderer. You can then plug in a transform into the shape to make it do anything you need.
There are many different data types between the modules (they are called 'nodes' in VVVV) making it very hard to connect something where it doesn't belong. It is almost foolproof.
This video was made with this simple patch. Maybe 15 components?

Check it out.
<3 VVVV
Oh yeah, did I also mention it's free for non-commercial use? Actually the license is kinda better than non-commercial. It basically says as long as you don't make a living from using VVVV you can have it for free. I would love to be forced to pay for VVVV one day.
You can do some really cool stuff really easily with 3d graphics in VVVV. rendering a model is as simple as patching a shape into a renderer. You can then plug in a transform into the shape to make it do anything you need.
There are many different data types between the modules (they are called 'nodes' in VVVV) making it very hard to connect something where it doesn't belong. It is almost foolproof.
This video was made with this simple patch. Maybe 15 components?

Check it out.
Camera Spheres from jonathan ferran on Vimeo.
<3 VVVV
Sunday, March 14, 2010
Here are a couple videos of what I'm working on.
The first one is more of a lighting program that reacts to movement. It is meant for projection on to a dance floor and will light up anything that moves with pastel particles.
This is some terrain. It's fun. Lots can be done with this.
The first one is more of a lighting program that reacts to movement. It is meant for projection on to a dance floor and will light up anything that moves with pastel particles.
Easter dots from jonathan ferran on Vimeo.
This is some terrain. It's fun. Lots can be done with this.
Terrain from jonathan ferran on Vimeo.
Sunday, March 7, 2010

Thanks to everyone who came out to the Flambe Lounge party last night!
It was great to hear all the wonderful feedback from everyone about the piece, and great to see all the awesome drawings people did.
See the box on the right to find your graffiti. Oh, and sorry if your graffiti didn't end up in the city, the software is still a bit buggy like that :P
JF
Friday, March 5, 2010
Heres the link to the party I am going to be showing my City piece at.
http://www.burningman.com/blackrockcity_yearround/special_events/flambe_lounge/index.html
http://www.burningman.com/blackrockcity_yearround/special_events/flambe_lounge/index.html
Thursday, February 25, 2010


Sunday, February 21, 2010

Tuesday, February 16, 2010
 I have been programming these particle physics simulation thingies lately. They are fun to mess with and the calculations can be applied to many different effects.
This stuff is way fun to mess with when you're bored.
See my openprocessing.org page for the interactive version.
Monday, February 8, 2010

Sunday, February 7, 2010
New computer
I decided I need to build a computer dedicated to being portable. I can't be lugging my whole desktop around whenever I want to show this thing off, so I need something a bit smaller.
Enter the portable desktop computer. It is based off a MicroATX motherboard which is about half the size of a standard desktop motherboard. I had this plastic equipment case lying around that I was just using to store stuff in, it looked like the perfect size to fit the small board. I did some research and found that the maximum dimensions of this type of motherboard is about an inch smaller than the smallest dimension of the case. Yay!
Components fit like a glove.
The standard size power supply dwarfs the micro sized motherboard.

The specs are as follows:
AMD Phenom II 3.1ghz dual core (overclocked to 3.6ghz woot)
ASUS M4N68T-M MicroATX motherboard
4Gb DDR3 1333 ram
old 40gb hard drive
old 400w ATX PSU
to be installed: ATI Radeon 4850 video card
Case is a plastic equipment case I had lying around.
Cost so far: $330

Modifying the case to fit the computer components should be fun. This motherboard fits PERFECTLY in the case with the power supply, it's like it was made for it.
OS installed.
Time from pic above to this point: about 45 minutes.


Saturday, February 6, 2010
Field - An algorithmic music performance engine
While learning this programming language processing I have been struggling over what ultimately should become of all this labor. Originally I started about a year ago with Max/MSP making components for electronic music production. Instruments such as synthesizers, granular processors, also sequencers and loop editors. My intent was to make a kit of home-built instruments and tools to be able to execute a very expressive live electronic music performance. The functionality part of the whole project was no problem for me, however, the challenge lied in the user interface side of things. I have some hardware midi controllers and these work okay, but I found it difficult to efficiently tie the computer and interfaces together.
It was through working with these controllers that I first came up with the idea of using multitouch for this music performance project. My ultimate intention is to make the interface and the program into one. I didn't think I would start working on it this soon, but I came across a concept that I thought would be very unique and expressive and also slightly generative for a music performance. I have started on a project that will either be really awesome or a big waste of time. We'll see!
Field is a musical instrument where objects slide across a plane and by encountering certain things in the world such as walls, cursors, fields, or other objects, sounds are generated.
Objects are created in the world through a multitouch interface. One finger sets an object bouncing around the world. Objects can have multiple parameters for playing sounds. An object can do something different depending on what it encounters. For example you can assign a different drum sample to each wall it bounces off of, and a note value to play when it passes across a field. Each object in the world can have a different value of each. You can create multiple objects at once and send them all in different directions creating complex random rhythms. An object's speed can be quantized in either or both the X and Y direction enabling creation of regular timed rhythms. Objects can be modified by cursors and fields.
Fields are static in the world and make sound when an object moves across them. Objects can be assigned a note value to play when moving across a field, or the field can choose the notes based on various parameters. Sounds in fields can be triggered from multiple parameters, such as object entering top, bottom, left, right, x position, y position, and speed.
Cursors appear when a certain gesture finger combination (such as 2 fingers) is presented. They perform various actions on the objects that move across them. The most common cursor will be the erase cursor. To remove objects from bouncing around the screen simply use 2 fingers to create a line between your fingers that will erase all objects that move across it. Other cursors include pitch modification and speed modification.
You will be able to select between different worlds, and move objects between worlds. This will create almost a loop selection structure to the instrument. There is virtually no limit to the amount of objects that can be bouncing around a world. Extremely complex compositions can be created if you use slow enough moving objects.
Here's a sneak preview of the super alpha alpha version, no sound yet even lol. Thats a cursor tho, hard at work erasing those balls.

If anyone wants to contribute to this, let me know. Right now it is on hold until I can program my way out of it being a cacophonous noisy mess.
Tuesday, February 2, 2010

Tuesday, January 26, 2010
Audio reactive multitouch visuals from jonathan ferran on Vimeo.
Multitouch visual program made in processing. It reacts to 6 bands of audio and of course multitouch.
Song is: Synaecide - Close Bracket
Monday, January 25, 2010


Saturday, January 16, 2010
I'm teaching myself a bit of programming to be able to write apps for this screen. I got the hang of making objects and now I am excited to continue learning.
I wrote a little paint app in processing. The color bars on the left can be dragged to set the red green or blue values of the brush. The box in the upper right erases the screen and also shows what color is currently selected.


Check here for app download and source code.


This one really shows off the kind of color variation you can get.

Tuesday, January 12, 2010
Hello World with processing and TUIO
Here is my first success at making a program that interfaces processing and TUIO.
Written with the touch surface

Yay Processing!

Written with the touch surface

Yay Processing!

Monday, January 11, 2010
I'm just doing boring stuff with the screen, and work has picked up so that takes most of my time. So in the mean time, here is some work that other people have done.
http://www.msavisuals.com/ has some fascinating work with interactive visual art.
Here's an example of some audio reactive realtime 3D rendering made with Quartz Composer.
Amoeba Dance from Memo Akten on Vimeo.
Here's an interactive projection piece that transforms movement into images of splashing paint.
"Body Paint" Installation at "Clicks or Mortar", March 2009 from Memo Akten on Vimeo.
 Just a quick update.
The screen is pretty much complete. I have to cut a new piece of drafting film because this one is slightly out of shape.
One of the lasers is acting up so I have 2 more on order. The new ones will have the 90degree lenses on them to make for a stronger beam.
I'm working on learning processing now, but it seems the 1.3 version of CCV doesn't want to send proper TUIO messages, which sucks because it has a lot better image processing capabilities. I get better blobs with 1.3, especially with this bunk laser.
Here's my inspiration for visual effects.
Superfluid vs Particle from jimi hertz on Vimeo.
Saturday, January 9, 2010
Laser Power Module
I like working with lasers because they are just cool. It was a hassle to align the lasers, but I have the best excuse for why I stayed in the house on a friday night... "Oh, I had to align the lasers." "Had to troubleshoot the laser power module." Bad ass.
Anyway, stuff got wired up today. Soon I will post what my procedure was to align them. It took a while to figure out the right way to do it, but once I got it down, it's easy. The piece of acrylic is a bit bulged out in the middle so this made things a bit challenging. I need to get one of those nifty Peau Productions lenses for this camera because it can barely view the whole screen from where its mounted.
Here's some pics.
 The voltage regulator circuit. Outputs a constant 3.2 volts for the lasers, no matter what voltage is input. Only 4 components to this circuit, the voltage regulator (black square with metal tab) 2 resistors and a capacitor.
 USB Powered lasers.
 Ready for wiring.
 Laser Laser Laser Laser. 2 with 120degree line lenses, 2 with 90 degree line lenses.
 This pic is cool because in real life the glow from the laser is a deep red.
 That's what the beam looks like.
 What the camera sees. Yay.
 This one's for Reda.
Final setup starts tomorrow.... now to write some software.... hmmm.... www.processing.org
Friday, January 8, 2010


Wednesday, January 6, 2010
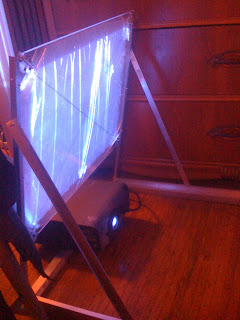
Let there be light.
I finalized the design for the frame today. It is now a solid piece of 1" square stock around the whole base. This makes the whole thing pretty sturdy and square.
Projector mock up. The throw distance and the mirror size are spot on for this lens.

It also folds up nicely. It should be very easy to transport.

After a much needed trip to the hardware store for some more aluminum stock and fasteners, I had what I needed to finish the frame.

The frame base uses 1" square aluminum stock around the whole bottom of it. This keeps things nice and square and solid.


Aligning and squaring the corners in preparation for drilling holes.
 close up of corner construction.
I redid the mirror mount. It is now a lot more solid. It doesn't shake around as much as before.


Final mirror mount.
Projector eye view.

Today's result. Note in the 3rd pic the projector is slid forward. This is about as far forward as it can go, not bad for such a long projector.


Subscribe to:
Comments (Atom)